Yeah, you read that right. everything in the following pictures was unwanted by one of my friends, but very much wanted by me. The first picture is of everything sitting in a big pile, and the rest are some highlights.
Friday, July 9
Thursday, July 8
Pictures will have to wait until tomorrow, I'm afraid, as I am positively exhausted by tonight's events. Exhausted in a good way, of course! In an I've-been-wading-through-a-pile-of-clothes-for-perfect-gems-for-three-hours kind of way.
I just hosted a naked lady party. Pretty much my favorite kind of party. You invite a bunch of friends, everyone brings a bag full of old clothes, and then you swap! It's lovely!
I found some really great pieces - a suede skirt that's PERFECT except the zipper's broken, several vintage sweaters, lovely retro pink heels.
But. You will have to wait in suspense until tomorrow, I'm afraid. I'm going to sleep now.
G'night, Internet.
I just hosted a naked lady party. Pretty much my favorite kind of party. You invite a bunch of friends, everyone brings a bag full of old clothes, and then you swap! It's lovely!
I found some really great pieces - a suede skirt that's PERFECT except the zipper's broken, several vintage sweaters, lovely retro pink heels.
But. You will have to wait in suspense until tomorrow, I'm afraid. I'm going to sleep now.
G'night, Internet.
Tuesday, July 6
Today's Shopping Scores
Today, my grandmother, mom, sister and I (three generations of my family!) went shopping at the Towson Town Center. Let me tell you, that mall is huge. Or at least compared to what I'm used to.
I stopped by the shoe store completely on a whim, to discover much to my delight that most of the shoes were around $10! That's how much this pair cost. They're more purple than they look in the picture.
The tank and dress both came from XXI (Forever 21 trying to be upscale?) and were $15 and $20, respectively. The best part is that the tank is covered with owls!!! I do love me some owls.
And sorry the pictures aren't great. I took them about ten minutes ago when I decided I wanted to blog about my clothes before going to bed but didn't have pictures of them.
Monday, July 5
Knitting + Adorable = Win!

Mochimochi Land is the source of some (most) of my favorite handmade things on the internet, so I am absolutely ecstatic that there's now a book!
Unfortunately, I doubt it'll ever be available in the piss-poor library system in my county, so I might just have to shell out some cash for this one at Barnes and Noble.
Once I get my hands on it, though, be sure of two things:
1. I'll be the happiest knitter alive!
2. You, dear readers, will be hearing allll about it.
HOW TO Sew a Skirt out of a Yard of Fabric
So before I get to the main topic of this post, I have a piece of business to take care of first: My giveaway! The winner is Ali of The Drawing Mannequin! She has a cute, fashion-y blog - go check it out!
And if you read this, Ali, email me! I need to get in touch with you to send you your present!
I've had this Alexander Henry fabric with the faces on it for a while now. My mom got me a yard either last Christmas or the Christmas before that and I've been waiting for the perfect project. A couple days ago it hit me - this fabric needed to be a skirt!
So I measured myself a couple times, wrapped the fabric around my hips, then folded it in half and wrapped it around my hips again. I wanted something easy (read: elastic waist, no zipper) and long enough to be worn at the waist or at my hips. Here's what I came up with in order to get the most mileage out of just a yard of fabric.
And note: There are a LOT of pictures in this post. Sorry about the image overkill, but I wanted to be absolutely clear about every step!
What you need: A yard of fabric and enough elastic to go around your waist. That's it! Make sure to get the proper type of elastic to put in a skirt, though. It'll be about 3/4 inches high and have vertical ribs in it so it doesn't roll up.
Step 1. Cut a strip (about 4 inches) off one of the raw edges (cut selvedge to selvedge).
Now, measure the width of your fabric (selvedge to selvedge) and cut it in half. The easiest way to do this is just to fold the fabric in half, press, and then cut along the fold.
The long edges of these two pieces will be the waist and hem. Put the two rectangles right sides together and sew along the short sides, forming a tube. If your fabric has a conspicuous pattern like mine does, make sure to sew them so that the pattern is facing the same way throughout the skirt. Then, make sure to finish off your seams so they don't unravel. This is very important! A simple zig-zag stitch on the raw edges is perfect!
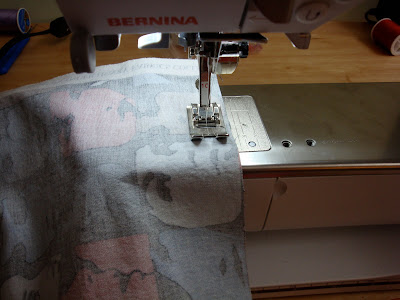
The next step is the hem. Fold up one of the edges of the tube, press, then fold up again (this makes sure there aren't any raw edges that might unravel later), press again, and sew. Because I generally fail completely at hemming, I always end up taking an inch and a half off the bottom of the skirt. If you have the finesse to make a smaller hem, I congratulate you. I've never figured it out. Because my hem was so wide, I sewed twice around the bottom - once next to the folded edge and again right next to the bottom of the skirt. Just because I think it looks nice.
I'd like to add a note here. I'm pretty lazy, so I try to avoid all unnecessary work. For this reason, I very rarely change the color of my thread. Some people are really particular about their thread matching their fabric, but the way I see it, white matches everything.
Now we're going to work with the waistband for a bit. This is a neat little trick I learned in a dress pattern once, and it really is very useful because it does a good job of hiding raw seams with minimal sewing. The waistband is sort of like wide bias tape. You'll see.
So take the strip you cut out to be your waistband and sew it into a tube. Then fold it in half and press. Then unfold your tube, fold one of the edges down about half an inch and press this down, making sure not to iron over the middle crease.
Okay. Now leave this on your ironing board for a minute and pick up your skirt. If you lay the two tubes next to each other, you'll notice that they're not the same size. We need to gather the top of the skirt before we sew it onto the waistband.
With your sewing machine on its longest stitch setting, sew around the top of the skirt. Don't backstitch at the beginning or end of the seam. Take the ends of the threads and pull on them. This'll make the skirt bunch up. Do this until the skirt is about the size of your waistband, then tie the thread ends so they don't go anywhere. Try to make sure your skirt is pretty evenly gathered.
Now pin the raw edge of your waistband to the gathered edge of your skirt (right sides together!) and sew them together.
Back on your ironing board, fold down the middle crease again. The folded edge of the waistband should cover (or come close to covering) the seam you just sewed.
Now sew this down. You can sew from either the front or the back side. I sewed from the outside of the waistband, trusting that it'd catch the folded-down edge, for the simple reason that what the outside of the skirt looks like matters more than the inside. I wanted a nice, clean line along my waistband.
When you're sewing this seam, DO NOT sew all the way around. Leave about two inches between the start and finish. You need this opening to thread your elastic through.
Now find your piece of elastic and cut it to three or so inches smaller than your waist. This is important! At first I cut it to be just the size of my waist, but then it was too big when I put it on so I had to rip out my seam and shorten the elastic.
Pin a safety pin to the end of your elastic and use this to thread it through your waistband. Overlap the two ends of the elastic about an inch and sew them together. Make sure the elastic isn't twisted as you put it through the waistband.
Now finish sewing your waistband shut and voila! Your skirt is ready to wear!
Note: Sorry I look like such a hobbit in these two pictures. My sister doesn't know how to take pictures that don't make me look like a midget.
If you make any skirts like this, please let me know! I'm excited to see how they turn out!
And if you read this, Ali, email me! I need to get in touch with you to send you your present!
I've had this Alexander Henry fabric with the faces on it for a while now. My mom got me a yard either last Christmas or the Christmas before that and I've been waiting for the perfect project. A couple days ago it hit me - this fabric needed to be a skirt!
So I measured myself a couple times, wrapped the fabric around my hips, then folded it in half and wrapped it around my hips again. I wanted something easy (read: elastic waist, no zipper) and long enough to be worn at the waist or at my hips. Here's what I came up with in order to get the most mileage out of just a yard of fabric.
And note: There are a LOT of pictures in this post. Sorry about the image overkill, but I wanted to be absolutely clear about every step!
What you need: A yard of fabric and enough elastic to go around your waist. That's it! Make sure to get the proper type of elastic to put in a skirt, though. It'll be about 3/4 inches high and have vertical ribs in it so it doesn't roll up.
Step 1. Cut a strip (about 4 inches) off one of the raw edges (cut selvedge to selvedge).
Now, measure the width of your fabric (selvedge to selvedge) and cut it in half. The easiest way to do this is just to fold the fabric in half, press, and then cut along the fold.
The long edges of these two pieces will be the waist and hem. Put the two rectangles right sides together and sew along the short sides, forming a tube. If your fabric has a conspicuous pattern like mine does, make sure to sew them so that the pattern is facing the same way throughout the skirt. Then, make sure to finish off your seams so they don't unravel. This is very important! A simple zig-zag stitch on the raw edges is perfect!
The next step is the hem. Fold up one of the edges of the tube, press, then fold up again (this makes sure there aren't any raw edges that might unravel later), press again, and sew. Because I generally fail completely at hemming, I always end up taking an inch and a half off the bottom of the skirt. If you have the finesse to make a smaller hem, I congratulate you. I've never figured it out. Because my hem was so wide, I sewed twice around the bottom - once next to the folded edge and again right next to the bottom of the skirt. Just because I think it looks nice.
I'd like to add a note here. I'm pretty lazy, so I try to avoid all unnecessary work. For this reason, I very rarely change the color of my thread. Some people are really particular about their thread matching their fabric, but the way I see it, white matches everything.
Now we're going to work with the waistband for a bit. This is a neat little trick I learned in a dress pattern once, and it really is very useful because it does a good job of hiding raw seams with minimal sewing. The waistband is sort of like wide bias tape. You'll see.
So take the strip you cut out to be your waistband and sew it into a tube. Then fold it in half and press. Then unfold your tube, fold one of the edges down about half an inch and press this down, making sure not to iron over the middle crease.
Okay. Now leave this on your ironing board for a minute and pick up your skirt. If you lay the two tubes next to each other, you'll notice that they're not the same size. We need to gather the top of the skirt before we sew it onto the waistband.
With your sewing machine on its longest stitch setting, sew around the top of the skirt. Don't backstitch at the beginning or end of the seam. Take the ends of the threads and pull on them. This'll make the skirt bunch up. Do this until the skirt is about the size of your waistband, then tie the thread ends so they don't go anywhere. Try to make sure your skirt is pretty evenly gathered.
Now pin the raw edge of your waistband to the gathered edge of your skirt (right sides together!) and sew them together.
Back on your ironing board, fold down the middle crease again. The folded edge of the waistband should cover (or come close to covering) the seam you just sewed.
Now sew this down. You can sew from either the front or the back side. I sewed from the outside of the waistband, trusting that it'd catch the folded-down edge, for the simple reason that what the outside of the skirt looks like matters more than the inside. I wanted a nice, clean line along my waistband.
When you're sewing this seam, DO NOT sew all the way around. Leave about two inches between the start and finish. You need this opening to thread your elastic through.
Now find your piece of elastic and cut it to three or so inches smaller than your waist. This is important! At first I cut it to be just the size of my waist, but then it was too big when I put it on so I had to rip out my seam and shorten the elastic.
Pin a safety pin to the end of your elastic and use this to thread it through your waistband. Overlap the two ends of the elastic about an inch and sew them together. Make sure the elastic isn't twisted as you put it through the waistband.
Now finish sewing your waistband shut and voila! Your skirt is ready to wear!
Note: Sorry I look like such a hobbit in these two pictures. My sister doesn't know how to take pictures that don't make me look like a midget.
If you make any skirts like this, please let me know! I'm excited to see how they turn out!
Saturday, July 3
5 Sites That Fuel my List Obsession
I'll be the first to admit that I have slight compulsive tendencies. But not in a bad way! I just like to be organized. I mean, I'm not freakishly tidy and obsessive about organization - my bedroom is in a constant state of healthy chaos, and I very rarely make my bed.
But I love lists. I just love organizing things, putting them in order. My bookshelf is, to me, perfectly organized, but to others looks random. I suppose it does look kind of random, but I assure you, my bookshelf is organized loosely by chronology, size, color and genre.
So I enjoy nothing more on the internet than seeing things organized into lists. This is my list of lists, if you will, organized organization. Three of the websites I have an account with, and the other two I simply enjoy perusing.
1. Wists
With wists, you can build a wishlist using items from the entire internet! They don't even have to be for sale, really; anywhere you find a picture to your liking you can add it to your wist. You can tag the items, too, to organize them. I have tags like "inspiration" "nautical" and "literary" as well as tags to organize everything into different types of clothing, colors, etc. You can also look at what everyone else has on their wists and if you like something, copy it onto your own list. And you can put a widget onto your blog so that everyone can see what you like!
And here's a link to my wist!
2. 43 Things
At 43 Things, you keep a list of your life goals. Here's mine! Why 43 Things? Their philosophy is that "43 is the right number of things for a busy person to try to do. Why not more? It's too much. Why not less? You can do less, but it's still called 43 Things."
So at its core, 43 Things is a list of things you're trying to do with your life. You can rank them in order of importance, and add entries about your progress. After you finish one of your goals, you can write a "how I did it" entry to help others. The best part of the website, though, is cheers. Cheers are just little ways of supporting other people. You think it's awesome that this girl is trying to learn yoga? Give her a cheer! And it's so fulfilling when you get cheers! It's easy to let something you want fall by the wayside, and cheers just make you feel better about yourself.
3. Listography
I live and breathe Listography. While on 43 Things I have that I want to watch imdb's top 250 movies, on Listography I have the whole list written out that I can edit to my heart's content, crossing off items as I go. I have TONS of to-do lists, but I must admit, many people are much more creative with their listographies. You can have lists of smells that remind you of your grandfather, movies you cried while watching, hairstyles you want to try, anything! And if you can't think of a list you want to write, the website can generate a list topic for you! I generated a couple just now, just to see what it'd come up with and I got "what I'd do with a million dollars," "questions I have for the universe" and "interesting wikipedia reads." This is one of my absolute favorite websites! Here're my lists.
4. Listology
The only reason I don't have an account here is that it's too much like Listography. I do stop by from time to time, though, to see what other people have on their lists and maybe inspire some lists of my own.
5. Listal
Listal is another website I like to look at. The lists here are mostly pop culture in nature. It's great if you're looking for something like Best Science Fiction books of the 2000s or Top 20 Foreign Films. There are also some odder lists, like one I saw once with celebrities with cats. The best thing by far about Listal is that all of the lists are picture lists. That makes it really easy to relate to, in my opinion.
So. If you weren't obsessed with lists before you read this, I'll bet you are now! They're great! Do any of you use these websites, or ones like them?
Go forth and list, my friends!
PS. Oh, and I almost forgot! Enter my giveaway! Only one person has entered so far, so if no one else enters by tomorrow night, it's going to her!
But I love lists. I just love organizing things, putting them in order. My bookshelf is, to me, perfectly organized, but to others looks random. I suppose it does look kind of random, but I assure you, my bookshelf is organized loosely by chronology, size, color and genre.
So I enjoy nothing more on the internet than seeing things organized into lists. This is my list of lists, if you will, organized organization. Three of the websites I have an account with, and the other two I simply enjoy perusing.
1. Wists
With wists, you can build a wishlist using items from the entire internet! They don't even have to be for sale, really; anywhere you find a picture to your liking you can add it to your wist. You can tag the items, too, to organize them. I have tags like "inspiration" "nautical" and "literary" as well as tags to organize everything into different types of clothing, colors, etc. You can also look at what everyone else has on their wists and if you like something, copy it onto your own list. And you can put a widget onto your blog so that everyone can see what you like!
And here's a link to my wist!
2. 43 Things
At 43 Things, you keep a list of your life goals. Here's mine! Why 43 Things? Their philosophy is that "43 is the right number of things for a busy person to try to do. Why not more? It's too much. Why not less? You can do less, but it's still called 43 Things."
So at its core, 43 Things is a list of things you're trying to do with your life. You can rank them in order of importance, and add entries about your progress. After you finish one of your goals, you can write a "how I did it" entry to help others. The best part of the website, though, is cheers. Cheers are just little ways of supporting other people. You think it's awesome that this girl is trying to learn yoga? Give her a cheer! And it's so fulfilling when you get cheers! It's easy to let something you want fall by the wayside, and cheers just make you feel better about yourself.
3. Listography
I live and breathe Listography. While on 43 Things I have that I want to watch imdb's top 250 movies, on Listography I have the whole list written out that I can edit to my heart's content, crossing off items as I go. I have TONS of to-do lists, but I must admit, many people are much more creative with their listographies. You can have lists of smells that remind you of your grandfather, movies you cried while watching, hairstyles you want to try, anything! And if you can't think of a list you want to write, the website can generate a list topic for you! I generated a couple just now, just to see what it'd come up with and I got "what I'd do with a million dollars," "questions I have for the universe" and "interesting wikipedia reads." This is one of my absolute favorite websites! Here're my lists.
4. Listology
The only reason I don't have an account here is that it's too much like Listography. I do stop by from time to time, though, to see what other people have on their lists and maybe inspire some lists of my own.
5. Listal
Listal is another website I like to look at. The lists here are mostly pop culture in nature. It's great if you're looking for something like Best Science Fiction books of the 2000s or Top 20 Foreign Films. There are also some odder lists, like one I saw once with celebrities with cats. The best thing by far about Listal is that all of the lists are picture lists. That makes it really easy to relate to, in my opinion.
So. If you weren't obsessed with lists before you read this, I'll bet you are now! They're great! Do any of you use these websites, or ones like them?
Go forth and list, my friends!
PS. Oh, and I almost forgot! Enter my giveaway! Only one person has entered so far, so if no one else enters by tomorrow night, it's going to her!
Thursday, July 1
A Stashbuster Scarf
My problem: I love movies. I'm on a quest to watch the IMDB's top 250, and to finish the top 25 by the end of the summer. (Only 9 more to go!!!!) BUT. I'm fidgety. I don't have the attention span to sit still for two hours or so and watch a movie. I need something for my hands to do while my brain is concentrating on my computer screen.
My solution: Knitting! I wanted something REALLY easy, so I started a big chunky scarf. Any monkey could knit it - hold a couple strands of yarn together and knit garter stitch on size 35 needles. I would've finished it while I was watching 12 Angry Men just now, but I ran out of one of the yarns I was using and I need to find something similar to replace it.
PS. I can't believe it took me almost the entire movie to realize that Juror #2 is Piglet!
My solution: Knitting! I wanted something REALLY easy, so I started a big chunky scarf. Any monkey could knit it - hold a couple strands of yarn together and knit garter stitch on size 35 needles. I would've finished it while I was watching 12 Angry Men just now, but I ran out of one of the yarns I was using and I need to find something similar to replace it.
PS. I can't believe it took me almost the entire movie to realize that Juror #2 is Piglet!
Subscribe to:
Posts (Atom)


